modelling is a process which the form is built up using a malleable material, such as clay or wax. this gives the sculpture much greater freedom because one can add or subtract material to the form, allowing for mistakes to be made.
when doing large scale sculptures its not uncommon to create an armature or internal skeleton that helps to support the malleable substance. the armature must also be thoroughly thought through as the rest of the sculpture will be depending on its shape. another thing to take into consideration is the texture of the surface, taking advantage of the pliability of the material. modelling tends to be the medium between constructing and carving, favourited more by the direct and spontaneous sculptor.
carving is a process that is basically subtracting the material to create a form. materials used tend to be wood or stone but as i explained before plaster can also be used after casted.
carvings were traditionally created from stone, such as marble, granite, limestone and sandstone. these materials, particularly marble, are extremely hard and require a great degree of patience to sculpt (during the renaissance period, a life-sized sculpture of a person would take many years to carve)
Saturday, 24 October 2015
Thursday, 22 October 2015
Location
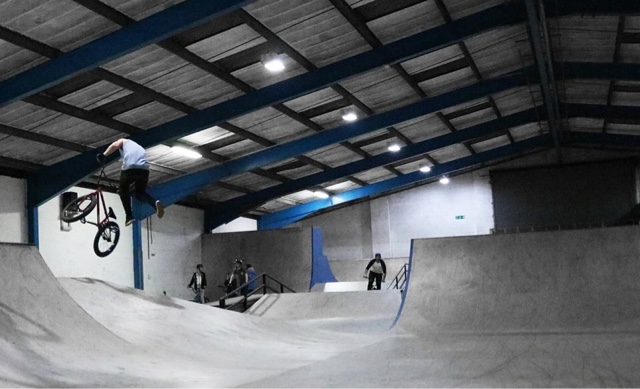
Location is possible they most defining thing in photo. it can either make or break the success. how many times have you seen a skatepark in a photo. hundreds! although, yes, some do look very intricate and complex it is rare because its just another skatepark photo and again its more about the action than the lifestyle. taking photos of a street, dirt or natural park setting really entice the viewer. however, it is often time illegal or fround apon. its also not very convenient to be running away from police with heavy and expensive camera gear either on your back or in your hand. but its the fact that each photo is completely different and really gives the viewer that deeper understanding of what and why we ride bmx.
lifestyle(behind the scenes work)&knowing the subject(rider)
Lifestyle.
Good sports photographers don't stop when the action does. Some of the most interesting and compelling images come from photos sot behind the scenes this is because the viewer then will gain a wider knowledge of how the subject actually live their lives. It when the viewer hasn't seen what the image is portraying whig really captivates the viewer. there is much more than just the riding in bmx, its the lifestyle too which is why many people decide to pick up a camera in the first place. Its mainly the tough of promoting and helping people understand why we do what we do that not only excites me but other none photographers riders. Everything from the places we go, sights we see, people we meet, all due to riding a bike. With this being said don't allow yourself to only get taught up in only the action of the sport. Think about again the people, places and culture.
Knowing the rider.
knowing your rider is as important as knowing the sport. knowing your rider allows you to depict what type of photo looks best and what setting are suitable. E.G- if your rider is tech, street, park, dirt etc these would all need different approaches. Same goes for what type of trick they are doing.
William Morris topsy
Died in London
Last years of his life he was an atheist
Wrote over 90 books
Set up his own printing press
Most popular poet in his day
His aim was to make the world more beautiful
Was extremely against industrialisation
His father died at age 50
So William Morris gain a slice of his fathers wealth
Passed his exams at 18 and went to Oxford
He in his first week of uni met Edward burne-Jones
Passionate about many things but especially poetry
Ruskin taught Morris to love gothic buildings as they promoted creativity
*i need to research socialist -A person who spouts socialist views but sits basically on his high horse looking down on all the less welthy.
Him and Edward decided to give up the church and set out on a life time of art.
He wanted to become a architect
Rossetti, the dark star entered mortises life
He was one of the founders of the preraphilites.
Morris gave up the architecture dream and began painting.
Morris created his own furniture for his flat because he didn't agree with mass produced furnishing
The death of Arthur was seen as their bible. This came from a midevil setting.
Morris had a anger issue.
Morris spotted a stunner at trip to the theatre.
Her name was Jane burtton
He didn't know much about women
She after many year told Morris that she didn't love him
However, he bribed her to stay with him
He painted all his walls white just like the survants quarters
Morris tried publishing his poem but didn't get very good exposure.
He then began on his next big plan.
He planned 500 illustrations and a epic cycle of poems
The public loved it
Morris became a celebrity
His friends weren't to happy, Rossetti became his bully
Morris's wife was seen differently by many people however, they all said that she spoke very little
Morris took her to be cured at the spa
Rossetti again took the piss out of him
Jenny(Morris's daughter) was an artist and born 18 months after his marriage
She isn't mentioned in any of the family's bio's probably because she was epileptic and in that day and age no one knew what to do with her. She died in her 70s.
Morris was hopelessly addicted to chloral, a colourless christaline solvent abuse. Rossetti died in Kent, London
Morris was empathetic of his death even after the abuse he had to take
When Morris went to work away, Janey 2 years later had an affair with a man called Wilfred. Morris never really loved his wife but it was the fact he love Rossetti that he stayed with her
He used to imagine his ghost hives above them making love
After his hate-rid of industrialisation he gained a understanding of politics and how industry ruined personality and creativity
He became a socialist and Marxist
Wednesday, 21 October 2015
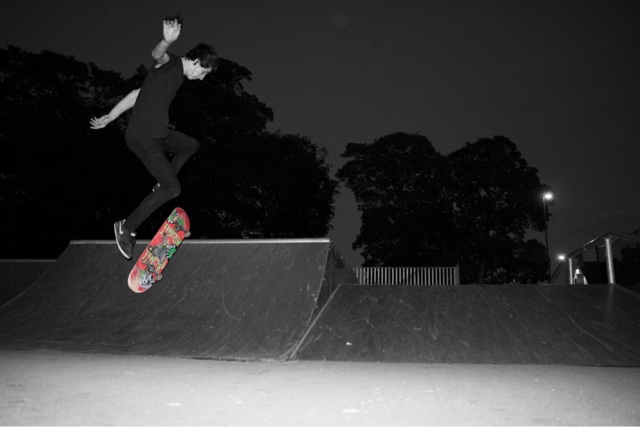
Specific saturation photos
In these photos I've took advantage of the bold colours in both the bins bad background.
In this photo I've been more suttle with the desaturation and kept some of the yellow tint but upped the blue and cyans.

In this one I attempted to keep the contrast up on the foreground ad background but down on the rider however, it's wasn't the greatest photo I've ever take so the rider still looks as if he's blending into the ceiling. Also I've rather than up the blues and cyans I've just kept them raw and desaturated every other colour.

This photo is my favourite out of this series because I've clearly highlighted the blues and cyans again. The difference with this one is I selected Krzysztof and copied the selection on another layer, this is so that when I desaturated the background layer the colour won't come out of the rider. After desaturation I still wasn't happy with how he was highlighted and still looked abit dull to me so I upped the contrast and brightness, slightly which gave it the focal point it need.
The two below are the first 2 in this series of photos. I selected the bike/skateboard again so it wouldn't be discoloured when desaturation get the image. I desaturated and upped the contrast and brightness appropriately. Although I'm not to pleased with how much the red bike comes out of the photo. It almost feels as if it was too far away however, I like the background and depth of the foliage.

I particularly like this one as the rider pops out of the photo even when desaturated because of the thick trees in the background although I'm not happy with how there's a fence and a street light in the centre right and right of the photo. I also like how the mostly red skateboard is extreamly eye catching because of the green graphics.
Tuesday, 20 October 2015
Using flash!
In this photo I used the in built flash to emphasis the skateboard, although this has been posted after all the others this photo was actually the first manual photo I took and came before all the dirt and desaturation photos. the rider and in my head pictured the ramps being slightly less lit-up. But the worst thing about this whole photo is how the floor is pretty much completely white and looks as if he'll land into nothing. This is because the camera was too close to the floor and my exposure wasn't the best. After this photo I've developed my skill much better in using the manual setting and I researched into flashes and positioning. This gave me the conclusion it rather difficult to get a good flash photo with a in built flash so an external flash is where I need to be looking.

Monday, 19 October 2015
Shooting burst photos
After tirelessly trying my hardest to get a burst photo for hours on end I stressfully gave up. After re composing myself after being defeated by my own camera I began doing research into the dilemma i kept hitting and reading through this artical created by Darren Rowse. It because apparent to me that I wasn't the only one who has ran into this problem.
Basically, my camera was set on manual and I had put the burst setting on, got my exposure near on perfect (quickest shutter speed the camera allowed) and had a few different angles in mind. Dylan(the rider/subject) roles up. I begin the burst shot. He get roughly 2/3 of the way through the trick and the burst stops. So I go back to the exposure setting lowering the shutter speed in hope that it will prolong the burst speed. It did nothing and long story short I got really agrivated and didn't take anymore photos that day. But I did notice that it was only taking at maximum 7 photos after I pressed the shoot button.
Going back too the artical, it explains that the size of the file you are trying to take the photo with e.g-raw etc will limit the amount of photos I can take. I think I was trying to shoot on a rawL format or soothing along those lines which only allowed me to take 7 photos on one burst. But apparently, if it's on just raw or another file setting it'll allow me to take more alothough the size of the file won't be near as big.
Sunday, 18 October 2015
mock fmp- photography tips, flashes.
So the first tip for flashes in bmx and any sports photography is the 45/45 setup. Basically where you have two flashes either side of the camera both pointing 45 degrees towards the subject/rider. This creates a cross lighting effect which will evenly light the rider thus making the rider pop out of the background. the amount all depending on the power levels your running your flashes.
the second tip is to place one flash at the back of the shot and pointing it directly at the rider using it as a rim light. for example -

the second tip is to place one flash at the back of the shot and pointing it directly at the rider using it as a rim light. for example -

ignore the yellow text box. but you can clearly see that the flash is placed just in front of those bushes behind the full pipe.
tip 3, if you only have 1 flash try pointing it towards the front side of the rider, seeing the subjects face is key in any type of sports photography.
Thursday, 15 October 2015
Mock FMP- Tyler fernengels silverdome stadium video and photography shoot
His video reached nearly enough every single mainstream media site from ESPN to yahoo. The dilapidated, run-down condition of the silverdome tugged at multiple strings of people that know absolutely nothing about BMX. Tyler filled some of the blanks with some insane riding so that people would gain that bit better understanding of the sport. His video hit 1.4 million views in just over a week and another million or so on the red bull player.
Mock FMP
Sinkachu
The 'little people project' which involves the remodelling and painting of miniature model train set characters. These figures are then placed, photographed and left on the street. It's both a street/urban installation project and a photography project. The street-based side of the artists work plays with he notion of surprise and to encourage the city dwellers to be more aware of their surroundings. The scenes/photos aim to reflect the loneliness and melancholy of living in a big city, almost being lost and overwhelmed. Underneath all of this there is always a hint of humour. People should be able to empathise with the tiny people in the work.
Art history William Morris
Industrialisation!
Ruskin was keen in preserving the environment.
Williams Morris's most famous quote, have nothing in your house that you do not believe to be known to be useful and beautiful.
Wednesday, 14 October 2015
properties of sculpture materials, general health and safety tips
clay.
traditionally dug directly from the earth and then modelled into shape before being fired at a high temperature to add strength and make a permanent form. heating the clay to such high temperatures must be done using a kiln which can be found in most community colleges that do ceramics or you can buy your own but it takes up a large amount of space and can be rather expensive. if you've used a synthetic clay they can be fired at much lower temperatures so you can use your oven or just leaving them out to dry will do just fine.
when storing clay it must be kept in a air tight bag because otherwise your clay will dry out. if your clay does happen to dry out then break it up into small pieces put it into a container (bowl) add roughly the same amount of water to clay and then it will start to reconstruct itself. before using the reconstructed clay cut the clay in half, slam either piece together and then repeat the process cutting perpendicular each time.
plaster.
commonly used to replicate purposes, such as the reproduction of greek and roman statues. however, plaster can be used as a material in its own rights. when cast into a block it can be used to carve into becoming a much cheaper and easier substance to carve. this is due to the fact that it reacts with the moisture in the air over time, causing it to set and become hard. plaster should like clay be kept in an air tight container and stored in a dry place.
when icing plaster, first half-fill a plastic bowl with water then begin sprinkling the plaster evenly around the bowl. stop when theres a peak in the centre of the bowl. next, mix the plaster with your hand until all of the lumps have gone and the mixture is smooth. when the box becomes a more creamy substance pour into a cast. when poured smack the surface that the cast is on to draw out any air bubbles from the mix. mixing plaster creates a chemical reaction and to speed up the reaction using warmer water usually does the trick. if you want it be slower use colder water. however, never change the plaster to water ratio because that only results in a poor consistency of plaster.
health and safety.
-when using plaster, dry clay or spray paint, always wear a dust mask and work in a well ventilated area.
-when clipping plaster wear goggles.
-when bending sharpe wire, cutting with a scalpel or hammering metal, always wear protective gloves.
-wash hands thoroughly after using glue, paint or plaster.
Who are Actaeon and Diana?
He was the son of Aristaeus who was a priestly herdsman and Autonoe in Boeotia. Like Achilles of the later generation, he was trained the centaur Chiron.
He fell in to the fatal wrath of Artemis(Diana), but surviving details of his crime vary. The only certainty is in what Actaeon suffered, his suffering and what Artemis did was made the hunter become the hunted. The was transformed into a stag with one splash of water and his raging hounds, struck with a 'wolf's frenzy', tore him limb from limb as they would a stag. This is the iconic motif by which Actaeon is recognised in both ancient art and in Renaissance and post-Renaissance depictions.
Artemis(Diana)
The Hellenic goddess of the hunt, wild animals, wilderness, childbirth, virginity and protector of young girls, bringing and relieving disease in women. She was often depicted as a huntress carrying a bow and arrow.
Metamorpahsis-sculpture idea
It's at this stage a wooden based frame and canvas with a relief of either plaster or clay of either Diana pointing out of the frame which resembles the scene where Diana gets and angry at Actaeon for seeing her naked, Diana splashing water out of the frame which is the scene where she turns Actaeon into a stag or a half and half face of Actaeon (human/stag).
Play ground design idea

This is my playground layout and ideas sheet.
In this I've got a few veriations of different segments of the playground. In the far right I was told that they liked the race track idea so that was key. In the centre section I had minimal leeway in what I could do as there's a sand pit in the top left section that is hard to move. To surpass this problem i tried thinking of a genre to base the 3 sections on, the world! The sand pit could resemble a island in the middle of the ocean. With waves and hop scotch boat around it. In the left section I've got a few ideas either a Forrest with snakes and ladders, a farm with o/x board or a town/village.
Tuesday, 13 October 2015
Brand ID-work development
The bottom section of this work sheet is the legal safety precautions what all earphones and headphones have to have on the packaging, somewhere. The top section which you can see is the first drawings of what will be my thumbnail sketch instructions on how to actuall use the ear phones.

Blow is a better quality picture of the 3 sketches. Showing you every possible thing you need to know about how to make the earphones work and there is some more functions I've wrote down. They will help you understand every function on the control panel.

The below sketch/blue-print is for one of my packaging designs. The design is based on 3D shape, icosahedron which is a 20 sided, triangular faced, :D hexagon. At the top I've made a net of the shape to show how it will have to be printed. In the centre, I've done a front view of the 3D shape and labelled it to show what exactly I'm going to do with the packaging. Although this will be developed further. The bottom section, is deadicated to the dimensions of each triangle of the shape so that the packaging won't be to big or small. Just right for earphone size. The overall reason why I chose this shape is because of how interesting and unique it is. No one would want to throw this away! This shape combined with a high quality block matte black plastic and the top section a combination of transparent and Lucent plastic, clear, will be a amazing looking piece.

Framework-Push it a stop blog post.
http://pushitastop.com/2015/07/02/framework-kriss-kyle-for-fuse-protection/
this blog post goes through the motion of how one single promo photo gets taken. from the test photos, the exposure, the lenses, the flashes and even the camera its self.
this blog post goes through the motion of how one single promo photo gets taken. from the test photos, the exposure, the lenses, the flashes and even the camera its self.
Monday, 12 October 2015
Exposure new link!
In the opening paragraphs he goes on about his back story in photography and he explains how hard it was for him to get the hang of using exposure correctly. He also goes on to say it wasn't until he understood the exposure setting that his photos became 'nice'.
He then continues with his back story and how he had a hit and miss technique until someone showed him a 'simple trick that changed everything'. Basically, he never payed attention to his cameras viewfinder and this is what tells you where the "sweet spot" is.
In the next paragraph he basically disclames the rest of the tutorial by stating the rest of the tutorial is for beginners.
In the first section he explains exactly what it is which I already found out in the previous website. So I then skipped to the next section.
In the next section it shows you a good little diagram of how to use your shutter speed. 1/200 for less lighted, darker images photos and 1/10 for more light, brighter images. He also uses the same sort of diagram for the aperture description f/11 for dark and f/1.2 for light. Note: the depth of field is larger when the aperture is at f/11 in comparison to f/3 and lower.
The next section is labelled 'don't forget ISO'
He explains how the ISO will effect the brightness of the image in conjunction to the quality. So basically the higher the ISO the brighter the image however, with increasing the ISO the colour noise increases as well, which doesn't give the photo as good of quality. Basically night time. high quality images, day time low quality images. (100-3200)
The next sections about metering in the camera. It's basically verifying everthing he told you throughout the other sections and then gives you a diagram of what you will see on your viewfinder. And basically it tells you that the -2 to +2 exposure level indicator should never have exposure anywhere else but dead centre.
Next section.
Getting the perfect shot.
For a indoor birthday party in the day time, you'd want let's say somewhere around 800 for your ISO, aperture to be at f/3 if possible if not lowest and your shutter speed to be 1/200 so you actually get a crisp photo of the movie people at the party. Then you look into your view finder to see what it says to do (only hold shoot button in half so it doesn't take a photo) it'll tell you that you need to change your shutter speed so using the eye piece (not the screen) you can see the shutter speed change as you move the wheel (on top of camera) left for the ELI to go right and same other way round. So to fix move it left until in centre of exposure level indicator (number line).
Note: and less than 1/100 you may need a tripod to keep the photo steady. & if you are shooting with a flash you can have much lower shutter speeds as the flash will capture the motion in place.
If shutter speed is to low to shoot try upping the ISO or lowering the focal length of lens allows.
safety precautions for earphones, Brand ID and Packaging
http://cdn.shure.com/user_guide/upload/80/pdf_en_se535_earphones_ug.pdf
these are the legal precautions every pair of earphones needs to have on the packaging. ill be using this to go towards the buyers guide/ instructions.
these are the legal precautions every pair of earphones needs to have on the packaging. ill be using this to go towards the buyers guide/ instructions.
How to use exposure correctly when taking photos.
Step 1-understanding what it is.
Exposure is controlled by the cameras light meter. This determines what the proper exposure is; it all sets the f-stop and shutter speed. (F-stop represents the focal length and is a fraction).
A good way to understand it is, think of a bucket of water with a hole in the bottom. If you have a large hole (large aperture) the water will drain quickly (fast shutter speed). Conversely, for the same amount of water, if you have a small hole in the bottom of the bucket (small aperture), the water will drain out slowly (slow shutter speed).
Exposure or lightness and darkness in the picture is a combination of the f-stop, which is the size of the hole in the lens, and the shutter speed, which is the length of time that the shutter is open. So, if you leave
Thursday, 8 October 2015
Sam Adams 10 tips on bmx photography
https://samadamsphoto.wordpress.com/2011/07/15/10-tips-for-bmx-photography/
I got to the 4th point but this website was vital in finding out some key generic points in how to change up my work.
SMART targets
To make sure I'm not just putting down general goals which I'll achieve by not doing really anything differently. I was told to use a SMART target which gives you a guideline almost in what you should be aiming to achieve. Also a specific goal has a large percentage of achievement than a general goal.
The 6 W's-
Who?
What?
Where?
When?
Which?
Why?
Example: A general goal would be, "get in shape" But a specific goal would say "join a gym and workout 3 times a week"
Wednesday, 7 October 2015


Mock fmp- Phil Neals bike and the book!
 This is Phils bike. It's originally for around the 1930s and when he got it was unusable to say the least. Although he did a remarkable job of restoring the bike he was unable to save the seat without it loosing it's heritage. He was forced to pick up another seat. Even though, it wasn't the original seat he managed to pick a seat up from the late 1930s.
After a good chat with him he went into the back and pulled out this book. In his words "it's an extremely funny read" and on a number of occasions referred to many parts in the book itself. So my initial thoughts and feelings are to A find the book if possible and/or purchase it. B to research it on google or C to loan the book from a library. This was due to his reaction and constant referral to the book.
Porfolio start
Doxdirect does a hard back from less than £5 and paper back for less than £2. This would be idea as it would look very professional and if I were to print off using paper back I could leave my portfolio with the university. To download the files they must be PDF's. The hard book copy must be anywhere from 10-600 pages so it is well within my page range. However, I've not looked at how much it will actually be with al of my photos, final pieces and development work.
Ideas-
Have a small amount of my best looking development work which will be like a story leading up to my final piece in that unit.
A lot of varied photos to show them versatility.
Key project final pieces from last year and this year. (Bus station)
Give examples of the multiple materials I've used during my course.
Try and find down of my work from AS level art and explain the difference between me then and now.
Phil Neal
Sculptur
Started in medical
Made glass eyes and replacement ears
Then moved onto making limbs for deformed people
Then worked in the bbc
But was soul crushing
Then made large toilets for adverts
Worked with sky on advertising
Moved into live casting
Live casted and edited famous people
Did toilet role comersials
Specialised in mad fur fabric
Advert for pirellie
Finer glass, silicone, plaster foam, wax where some of the materials used in the advert
Did set design, fairly small but very intricate work
A lot of maths work in the set design
Created gun cases out of fibre glass, carbon fibre and perspecs
More mad fury costume work
Left the film industry to travel around Europe on a motor cycle
Got a job at silverstone making models for wind tonels
Got offered a lot of money to work there but declined because F1 was sponsored by a brand of fags
Then got offered a job by a smaller motorcycle company which wasn't getting sponsored
With the bike designs he managed to make them that well at the end of the motorcycle season he got both bike on pole position in Australia
Moved into wood carving
Was interesting because never worked in that field before only did stone carving.
Moved into doing work for school.
Used work from the school to put into his own work.
A lot of wax work which can then be cast in silver and other metals.
Key point is to experiment with all possible materials and never give up.
Metamorphosis-reliefs coming out of canvases
In the picture below there's a cast of my face and fist and rather than the table a canvas of Diana flicking water out of the painting or drawing. And the cast will be either water droplets or her actual hand. The cast could be made up in different ways for example mod rock so there wouldn't be any sand on the cast so you could paint it to better effect.

Tuesday, 6 October 2015
Questions for artist of Harley gallery
How did you get where you are in your career?
How is your quality of life? Realustic?
What's business like?
What was your original interest in art?
How long have you been working in the creative industry?
Would you change anything that you did in the past?
Monday, 5 October 2015
Further development of my brand ID and logo
In this sheet below it shows my first strong product idea by using a icosehedren (20 faced shape using triangles) as the packaging. I've decided to go with shapes and object that begin with 'I' because after much development I indirectally placed a 'I' in my logo and rather change my logo more and waste time dwelling just encourperate it into my product.
The second picture is of my development of my logo since the concept sheet. I've also highered age in which I'm targeting with my product as I've noticed although it may appeal to a slightly younger audience than what I've altered it to, i won't have to change the advertising as the younger audience will be already inclined to this advertising.


Metamorphosis-sand casting using plaster!
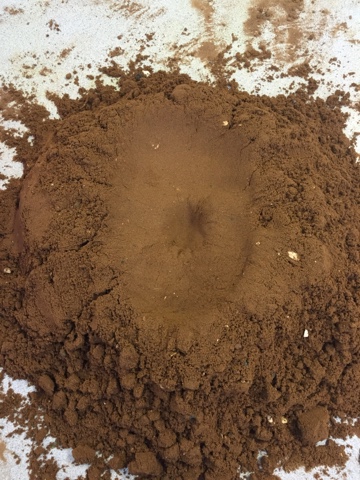
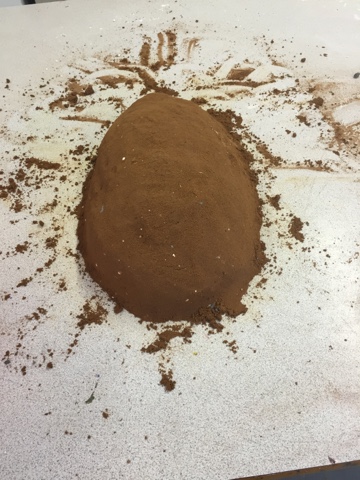
So to star off with you get a good lump of sand, siv all the large lumps out if needed! You must then wet it so that when you actually try and sculpt with it, it doesn't just crumble. Don't make a egg shape like the bottom picture because it doesn't give you much room to work on and wastes a good amount of your sand. Spread your sand so it's approximately 1/1.5ft squared wide and about 2-3inches thick. This will depend on what your making but for initial experiment to learn the craft of sand casting this is a good size. After this you can then start to create your cast. What's interesting about sand casting is the fact that you can do it by either making your sculpture in or around the sand. In this experiment I did the 'in' sand cast this was because I wanted to see how I worked thinking about everything the opposite way around because when the plaster is poured it'll set onto the shape not around it. Examples of internal sand casts are often baby hands and feet but in my case I did my face! As a safety precaution and for comfort I placed a layer of clingfilm over the sand so it didn't go in my eyes etc. I then got one of my fellow class mates to slowly apply a fair amount of pressure so that I didn't strain my neck trying to push down on the wet sand. The photo below is the final outcome as you can tell the experiment wasn't the best example of how plaster and sand can be used to create very acrurate casts. This was because I used to thick a layer of cligfilm thus taking away some of the detailing. However when cast some of the detail came through(picture not shown).

Thursday, 1 October 2015
Chindogu/Heath Robinson-Dirt Jump Photos
These are 4 of the photos I took to represent the difference between the craft of just riding through a forest or just jumping a jump and the art of actually making it look affective and making people go wow!


In 3 of the photos I used the magic paintbrush tool to select the rider quickly and then made another layer to out the rider on. In that layer I would then use the eraser tool to get rid of any bits of forest or things that aren't the rider. After this I would then change the contrast and brightness of the background layer which would give the effect of an above flash or lighting. In the 3rd photo I used the same technique as in the others but rather than change the brightness and contrast, I changed the saturation and colour.
pre-Raphaelites initial research and development
key names-
william holman hunt
john everett millais
dante gabriel rossetti
Ophelia, was a potential wife from the Shakespeare play Hamlet.
in the pre-Raphaelites composition each flower portrays a specific meaning for example: the weeping willow which is leaning represents forsaken love, the crow flower means childishness, the nettles that are growing around the willow tree branches mean pain, the daisies floating near aphelia's right hand represent innocence. Ophelia also mentions 'theres a daisy' in act IV, scene. the pansies represent thought and love in vain.
the model for the painting was lizzy sidle
lizzy sidle was considered a witch at the time due to her ginger hair and green eyes, much like elizibeth the first.
lizzy in later life committed suicide but was a conspiracy in whether in fact she was actually killed. to many peoples belief she intact over dosed on laudanum which was essentially opium. up until the 20th century this drug was sold on shelves but now is considered as addictive.
https://en.wikipedia.org/wiki/Laudanum
Rossetti-
known as the flamboyant, good looking, almost playboy essc figure in the pre-Raphaelite brotherhood. Rossetti and Sidle almost married many times in her life
Ruskin-
was a pre-raphaelite supporter. he was painted by Millais first in his house with one of his feet on the bottom of his step and then the background was then painted after.
Millais-
mid way through painting Ruskin, Millais basically had a affair with Ruskins wife. So it was said that at the start of the painting Millais was painting Ruskin at the bottom of the stairs and by the end he was painting from the top of the stairs.
Turner-
a famous landscape artist who's got a award named after him. who hated the thoughts and work of the pre-Raphaelites. a art critic and writer who shared this opinion was charles dickens.
Ruskin was also a key advertiser almost and supporter of turners work even though he avidly supported the brotherhood.
William Morris-
a very famous interior designer from the 18th century. his work is still used a key influence even now. very was is now known as traditional british designs, examples are prints flowers, plants Rossetti also had an affair with his wife but due to Rosseti's significance and almost VIP essc personality Morris drew a blind eye to it. he was also a member of the arts and crafts movement.
Subscribe to:
Posts (Atom)